Intro[]
I've written a tutorial for getting started with custom smeshes, this covers the stuff that is in the supplied document, but goes into a bit more detail with a bit more hand-holding. If you don't know how to model a static mesh yet, you should take a look at some of the videotrainings at http://www.3dbuzz.com. You will need to register on that page but it is really worth it. I recommend the tutorials on Unreal Technology (2nd issue, 3rd to 5th lesson).
Getting Started[]
I'm assuming people have set up their copy of 3ds max correctly with regards to plugins and environment variables and such as per the MaxConfig document. If not, do so now.
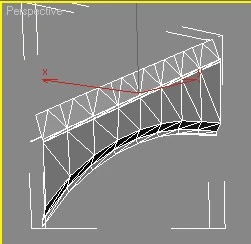
I'm going to use a model of a flying buttress I created earlier, it's pretty 'Thiefy' and would be the kind of thing you're likely to want to model and import.
Texturing[]
In order to texture the mesh, open up the materials editor and change the diffuse parameter of the first available material to "Ion Shader" from the Material/Map Browser.
I chose KEPwallB_D.dds texture as the Diffuse1 map and KEPwallB_N.dds as the normal map. (Diffuse maps are suffixed with _D and normal maps are suffixed with _N. Usually you will want 1 diffuse map and 1 normal map per texture). DDS textures can be found in:
C:\Program Files\Thief - Deadly Shadows\CONTENT\T3\Textures
Note that you can also import existing matlibs to avoid creating new material libraries for exisitng textures.
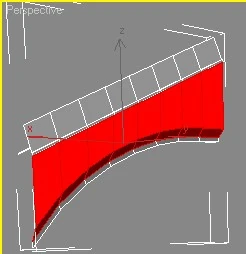
In the perspective viewport, I've now selected the polys that I want to texture with this material. In the Material editor, make sure "Show Map in Viewport" is selected, and then assign the material to the selection with the "Assign Material to Selection" button, which can also be found in the material editor.
You need to know how to UVW Map or even unwrap for texturing a smesh. The first thing is rather simple. Just add a UVW Mapping modifier and play around with the parameters. You can learn it best that way. But the second thing is very tricky at first. If you do not know it you should take a look at this tutorial. It shows the basic UVW unwrap techniques. In this case you will have to choose your texture as the background and edit the vertices to fit that texture. (In the case you don't see any texture there, you have to unwrap it without the ionshader, so just apply your textures as normal bitmaps to the object and everything should work fine)
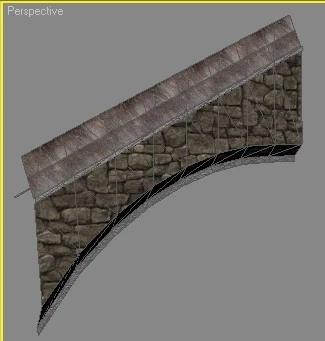
At this point I'm going to create some additional materials, and assign them to the relevant polys. Once I've created all my materials, assigned them and UVW mapped them, I end up with this:
Accessing Materials The Other Way - Importing and opening Material Libraries[]
Importing *.mlb files as Material Libraries in 3D Studio Max 5.1[]
The normal texturing method does not work for many people. Another method,then, is to import whole matlibs prior to using the materials in them. This can be accomplished with the MatExport plugin. Inside 3D Studio Max, to access this plugin. Just click on:
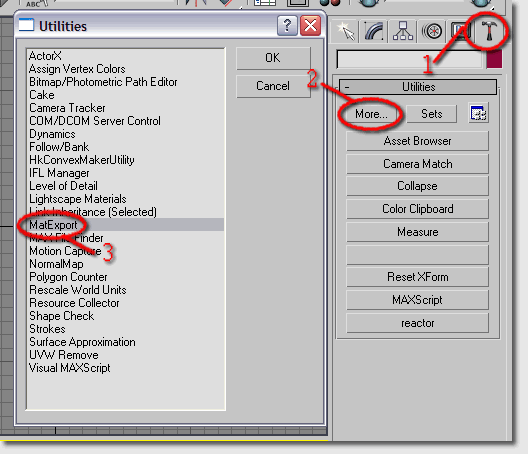
- 1.1 Utilities (the hammer tab in the panel to the right)
- 1.2 ...the More button...
- 1.3 ...and doubleclicking the MatExport heading...
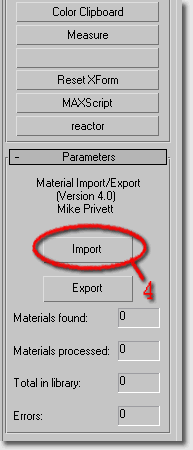
...will bring up the Parameters rollout. Find the Import button.
Note, that the MatExport plugin can also be assigned to a button in your 'Utilities' Rollout for more convenient access. See section 4 below to add such a one, and come back here after you're done.
Back? Ok :-) Let's move on. Whether you have accessed the MatExport plugin by clicking your new button, or by taking the long vay round as first described in part 1, you should now be looking at a the MatExport rollout in Max's right-side panel. It is shown in the 1.4 image above.
- 1.4 Click the Import button in the rollout to bring up a file requester asking you to locate the .mlb file to be converted to .mat format.

- 1.5 In the resulting file requester, browse to [your T3ED folder]\CONTENT\T3\MatLib and click on your desired matlib file, then click the 'Save' button.
The attentive reader will notice that the file requester window bears the label 'Save As'. This is actually quite misleading as it is indeed opening an .mlb file for conversoin. But alas, that's the way it is.
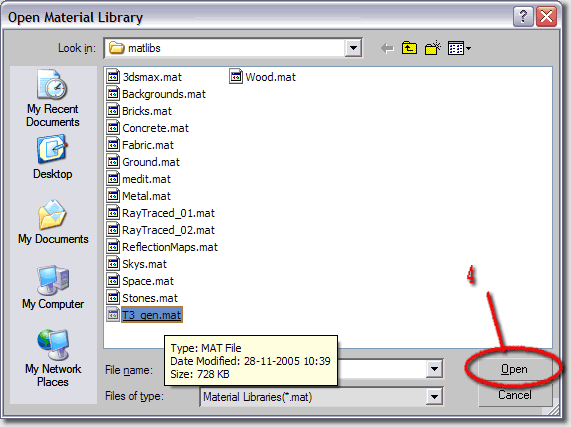
Afterwards, a file requester will pop up, asking you to enter the name and path of the .mat file you want to convert the .mlb file to. (As you can see, this plugin is rather a converter than an importer/exporter. So the name MatExport could actually be said to be a bit misleading as well). Don't worry that this file requester window bears the label 'Open'. It is really a save file requester.
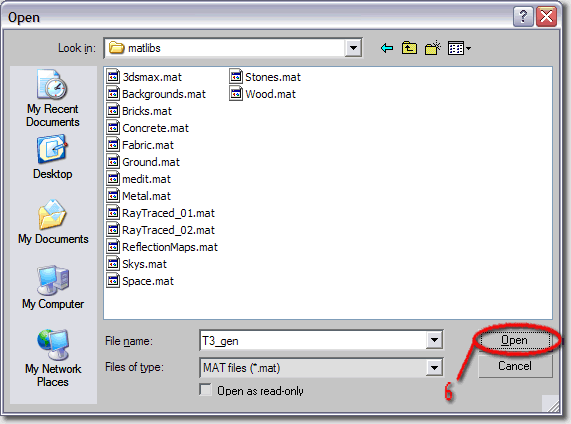
- 1.6 After selecting the place in which to store your matlib file, and giving it a name, click 'Open'.
For a good place to store your newly converted Thief matlibs, I recommend you browse to [your 3ds 5.1 folder]\matlibs and give your Matlib the same name as the .mlb file you just clicked on, which would be something like "T3_GEN".
Opening your new Material Library[]
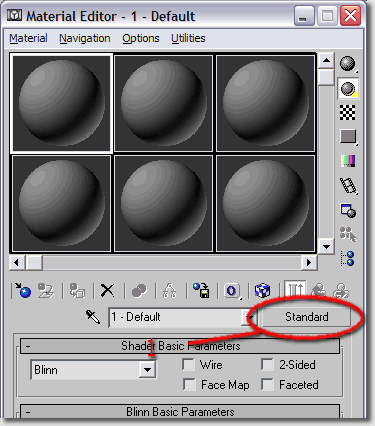
- 2.1 After converting the .mlb file to .mat, open the Material editor (tap #%m#%) and click on the button near the middle of the window and to the right of the drop-down menu. It is the one labeled Standard.
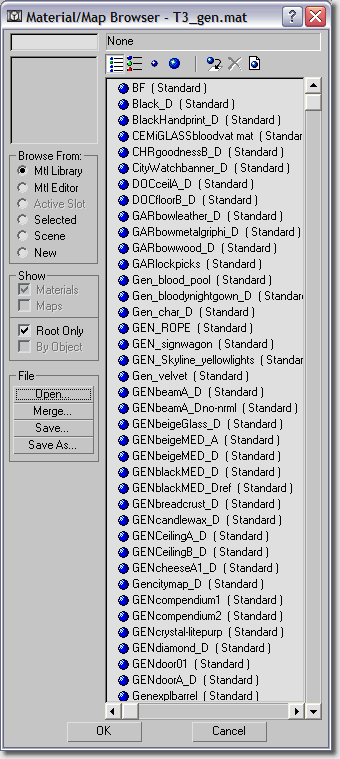
After clicking on Standard, a new window will pop up. This is the Material/Map browser, where you will be able to open and select from your newly converted materials:
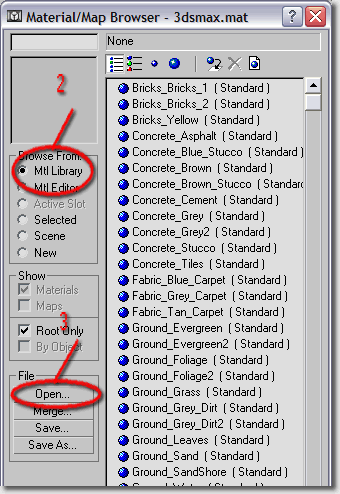
In the material/ map browser window:
- 2.2 on the Mtl Library radiobutton in the 'Browse From:' group
- 2.3 click on the Open button in the 'File' group. To be found in the same coloumn as 'Browse From:'
- 2.4 in the resulting file requester, browse to [your 3ds 5.1 folder]\matlibs, or wherever else you might have put your new material library. Double-click on your newly converted .mat file to open that material library, or single-click the file and then click the 'Open' button.
Opening a material in the Material Editor[]
Now you have the matlib loaded and can just choose a material from the Material/Map browser list:
You will probably not be able to preview any selected materials from here, so it is always useful to have T3ED (or some other tool) opened in order to preview the textures before adding them to your material editor. There are several ways to assign a material from the Material Editor to actual geometry in the viewports. This is general 3D Max knowledge and is aptly covered in other tutorials around the web. Also hitting #%F1#% to bring up the online documentation can be helpful.
Interesting pages for further study:
Adding the MatExport button (optional)[]
Instead of going through the chore described in section 1 every time you convert a material, you can also add a MatExport button for direct access from the Utilities panel. To set up this button,
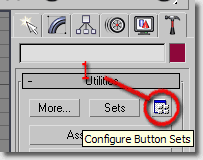
- 4.1 click on configure button sets. In the window that pops up, you will see a long list of functions and commands on the left. Near the bottom of the list, you will find these entries:
- 'Exporter'
- 'MatExport'
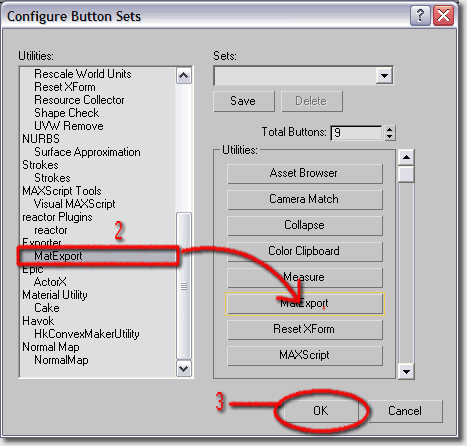
- 4.2 Click and drag the 'MatExport' entry to a button you want to overwrite in the Utilities panel in the rightmost part of the window, and voila! a MatExport button has been added to your Utilities (a.k.a. Hammer) Panel.
- 4.3 Click Ok to commit to it.
Notes on assigning more than one material to a Static Mesh[]
To create a static mesh with more than one material just select your ion shader materials in separate slots, then convert the static mesh to an editable mesh (right mouse key on the mesh->Convert To...->Convert To Editable Mesh) and select the polygon of the mesh you want to add to that specific skin and click the assign material button on the Material Editor.
Viewport issues and possible solutions[]
You will probably experience that the materials don't show up in the viewport, although you assigned your material or Multi/Sub-Object to your mesh. This can be due to two reasons:
- The first thing is that the ion shader does only work with Editable Meshes and not with Editable Polys. You may work with a polyobject, because it comes with some handy features like weld and so on, but if you want to see the Ionshader textures you will have to convert to Editable Mesh, by right-clicking the modifiers stack and choosing the appropriate entry.
- The second thing is that you will have to click Show map in viewport(the blue-white cube in the material browser)for every ion shader map you apply. You can check whether you did it right by opening the Material/Map Navigator(on the right side of the lower scrollbar). All those parallelograms should be red. If they arent, click them. Then click the Show map in viewport-button. It wont work if you do this for the parent texture, so always remember to click the texture with the parallelogram before and the "Ion Shader" tag behind it. Your textures should now be visible in the viewport. Note that in this mode, polys will not highlight if you click them, without the wireframe enabled. You can enable it easily by pressing F3 or F4.
There's a useful thing concerning max: you can press #%o#% in order to deactivate "Adaptive degradation", which means that the wireframe does not disappear anymore, when you move the perspective viewport. Its actually a toggle. The other thing is that you should bind the "backface cull toggle" to a key, because with this activated you can see the backface of an object too which is sometimes very useful.
Static Mesh Pivot and Hardpoints[]
The pivot is the point on which a point- or a hingedattachment will take effect later. For example, If you have made a door you will want to move the pivot to someplace on the hinge. You can do this by clicking on Hierarchy (the third button in the same panel where you can click on create and modify), Pivot, Affect Pivot Only. Now you can move the Pivot to your desired location using the normal Select and Move tool. Note that turning your object has indeed an effect in 3ds, but hasn't in the editor. If you want to have that object rolley by a certain amount of degress in T3ED, you will have to rotate its pivot.
Hardpoints are places where other objects can be fixed to via Rigidattachments. For example: You want to add a doorknob to your door. You can make a Hardpoint by adding a dummy. Do this by clicking on
- create
- helpers (5th button)
- dummy
Just create the object like a normal cube and name it something like hp_[your desired name]. In this case we would call it "hp_knob" or something like that. It does not matter how big your dummy is, because it is again its pivot that matters. Hint: If you add a lightproperty to your smesh, the light will automatically be attached to the hardpoint called "hp_lighttarget", which you can just create using the descirbed method.
Exporting[]
Select the mesh, and if it still has a not-very-helpful name such as 'Box01', change it to something more meaningful, in example 'T3_Buttress'. Now export the mesh: File -> Export..., and choose to export as a .TIM file.
The file automatically has the same name as the mesh regardless of what you type in the filename box, so in this case, it's 'T3_Buttress.tim'. Two log files are also created in the same folder that you export the mesh to.
The typical folder in which you have to export the tim file is the following
(Thief editor folder)\CONTENT\T3\StaticMeshes
but you can also create your own subfolder to group all the static meshes you've created.
To use them, just start the editor and open the Static Mesh Browser, going to the folder where you've exported the file. You can also view the new object with the editor already started, but in this case you have to press the 'Reload Meshes' button in the Static Mesh Browser (this is very useful when you have to make little corrections to your new static mesh if it's not fitting its proper dimension or shape in the map, but in this case you have to turn off the 'Toggle Flesh Render Output' on the editor, otherwise you will not be able too see the changings. Once you've finished with the corrections, start the editor again and the render should be correct even with 'Toggle Flesh Render Output' enabled.)
Note that if you have created a new material rather than importing an existing T3 mat library, you will also need to export the material you have created using the matexport plugin (exporting the .MAT file to a .MLB new file [be aware, the plugin could overwrite accidentally an already existing material library if it has the same name of the .MAT file, since it doesnt' ask if overwriting or not]), which can be found in the 3dsmax utilities rollout if you have configured the paths correctly.
Collision sounds on the new object[]
When a new object is created with 3DS Max ed exportend as a .TIM file into the Thief 3 Editor, it has only one skin by default. This prevent the game to play and collision sound (things thrown against the new object, feets walking, running or jumping over the object), maybe for some bug of the game. To prevent this, just add another skin to the object: select the object, select a proper texture on the Texture Browser, keep pressed the 'Ctrl' button and click with the right mouse button on the part of the object you want to change the skin. After this release the 'Ctrl' button, click the right mouse button again and select 'Static Mesh->Add skin' on the contextual menu that came out. Enter the name you want for the new skin and click on OK/press the 'Enter' key. Repeating this method you can add almost infinite skins on your objects, but for making it sounds properly in collisions the skins must be at least 2 (Default and another one).